Integrating SharePoint Framework (SPFx) With Angular
Are you a SharePoint developer who is willing to learn how Angular Elements works with (SPFX) SharePoint Framework?
Across the world, SharePoint is one of the most fruitful enterprise-level collaboration platforms. SharePoint Framework is one of the most flexible frameworks for building SharePoint customizations. With very little SharePoint Framework-specific code you can easily build powerful client-side web parts using your existing Angular skills.
Let’s begin with step by step execution of the SPFx web part with angular elements.
What You Should Know?
- SPFx Development (SharePoint Framework)
- It’s essential that you are acquainted with Angular
- Office 365 subscription
- You will require visual studio code
- Browserversion: Chrome or Edge Chromium will be best for debugging and development.
Folder Structure
- SPFxWithAngular (Root)
- CorporateDirectory (Angular)
- CorporateDirectory-spfx (SPFx)
Create Angular Solution
- Open the command prompt and run ng new CorporateDirectory
- When prompted:
- Select No for Would you like to add angular routing and select Enter
- Select SCSS for Which stylesheet format would you like to use, and select Enter
- Run solution using ng serve
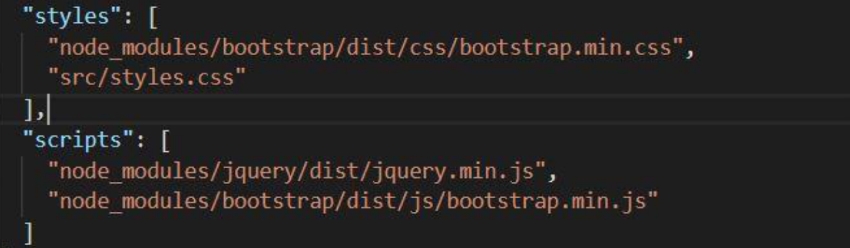
Let’s use Bootstrap UI (optional)
In Angular solution, we will also install bootstrap with jquery and popper js. so that way you can also import bootstrap CSS and bootstrap js function. Run following commands for Angular solution:
- npm install bootstrap –save
- npm install jquery –save
- npm install popper.js –save
After successfully running the above command, let’s import it into the angular.json file.
Create a custom element in Angular
To have elements functionality available, we need the Angular library and a polyfill with the new CLI it’s just a matter of one simple command:
- ng add @angular/elements
Then, the following are the major steps that need to be followed in app.module.ts
- Remove the default bootstrap array which is set to AppComponent
- Add App Component to the entry Components list
- Add ngDoBootstrap() to tell Angular to use this module for bootstrapping.
- Angularprovidesthe create Custom Element() function for converting an Angular component, together with its dependencies, to a custom element. The createCustomElement() function is expecting to get two parameter:
- First, the Angular component should be used to create the element.
- Second, configuration object. This object needs to include the injector property which is set to the current Injector instance.
- The next step is to register the newly created custom element in the browser. This is done by calling customElements.define().
- Now, app.module.ts should look like this:
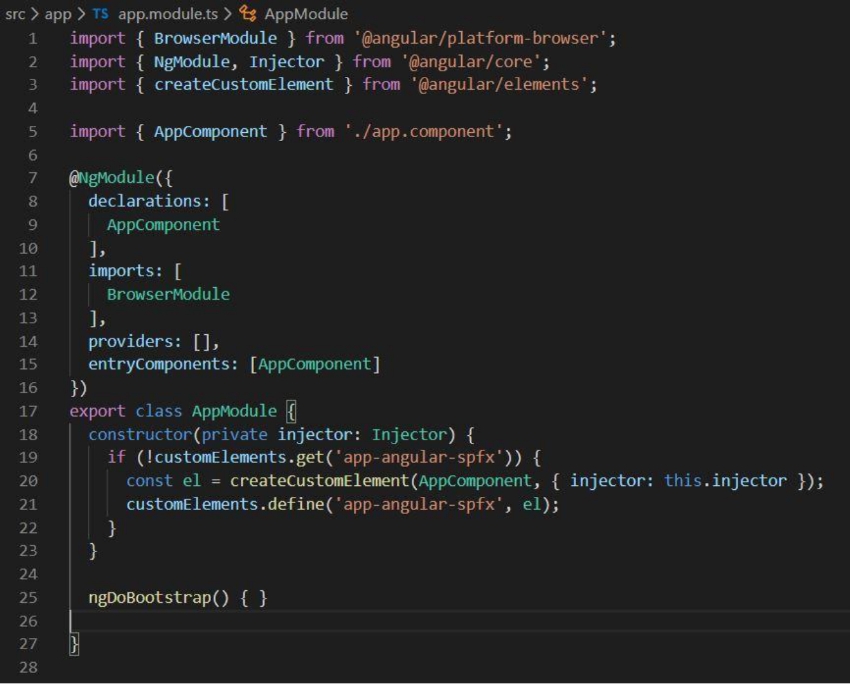
Now, app.module.ts should look like
- Now, we must register our custom element app-angular-spfx in the browser, for that we need to add a library using the following command:
- npm install document-register-element@1.8.1
- Add the following entry in angular.json under scripts:
- {“input”:”node_modules/document-register-element/build/document-register- element.js” }
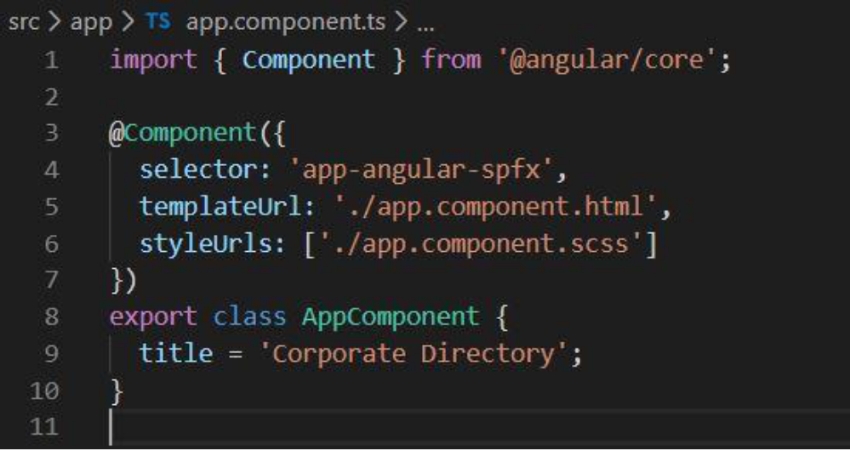
- Modify selector value in app.component.ts with our custom element name
Finally, Modify index.html by removing default
Finally, Modify index.html by removing default <app-root></app-root> tag, and add
<app-angular-spfx></app-angular-spfx>
Create SPFx solution
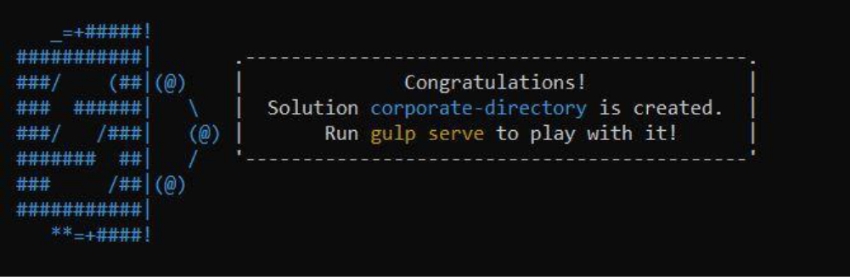
- Run Yeoman SharePoint Generator – yo @microsoft/SharePoint
- When prompted:
- Accept the default CorporateDirectory-spfx as your solution name, and then select Enter.
- Select SharePoint Online only (latest)/SharePoint 2019 onwards, including SharePoint Online, and select Ente
- Select Use the current folder for where to place the files.
- Select N to not allow the solution to be deployed to all sites immediately.
- Select N on the question if the solution contains unique permissions.
- Select WebPart as the client-side component type to be created.
- Type CorporateDirectory as your web part name, and then select Enter.
- AcceptCorporateDirectorydescription as your web part description, and then select Enter.
- Accept the default No javascript web framework as the framework you would like to use, and then select Enter.
- Run solution using gulp serve
Run solution using gulp serve
Build & Run
- At this point, we could execute ng server to see the application in action
- Run & build to compile an Angular app into an output directory named dist/ at the given output path
- Reference all JS files from Angular’s output director dist/ into SPFx project
- Navigate to web part CoporateDirectoryWebPart.ts
- Add JS files’ reference
- Put Angular’s custom element into render() method
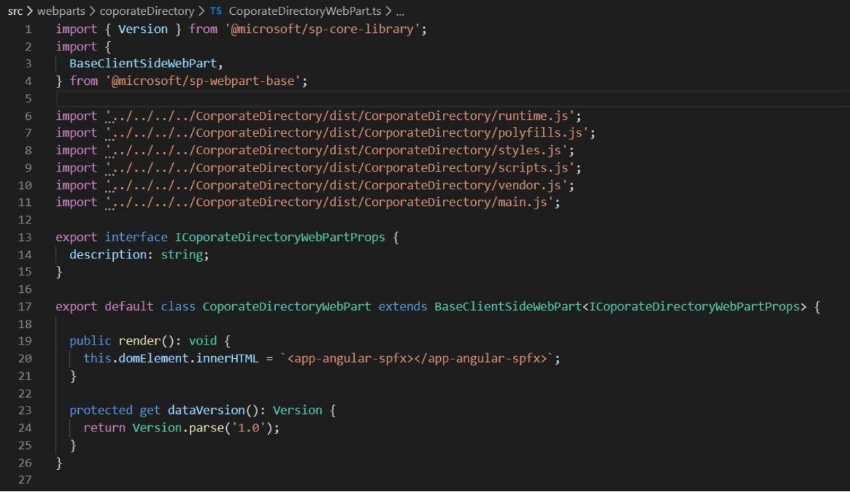
Put Angular’s custom element into render() method
- Run gulp serve
- Open {your site}/_layouts/15/workbench.aspx
- AddCorporateDirectorywebpart and Voila! We could see our Angular application loaded using SPFx.
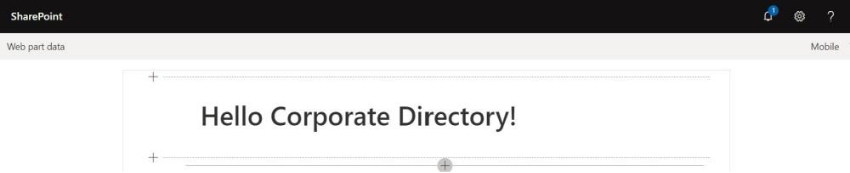
Running App
What Next?
In the next article, we will look into how to pass specific SharePoint Site URLs to Angular and perform REST of the operations.
Share your feedback on this content and stay connected for more!!